![]()

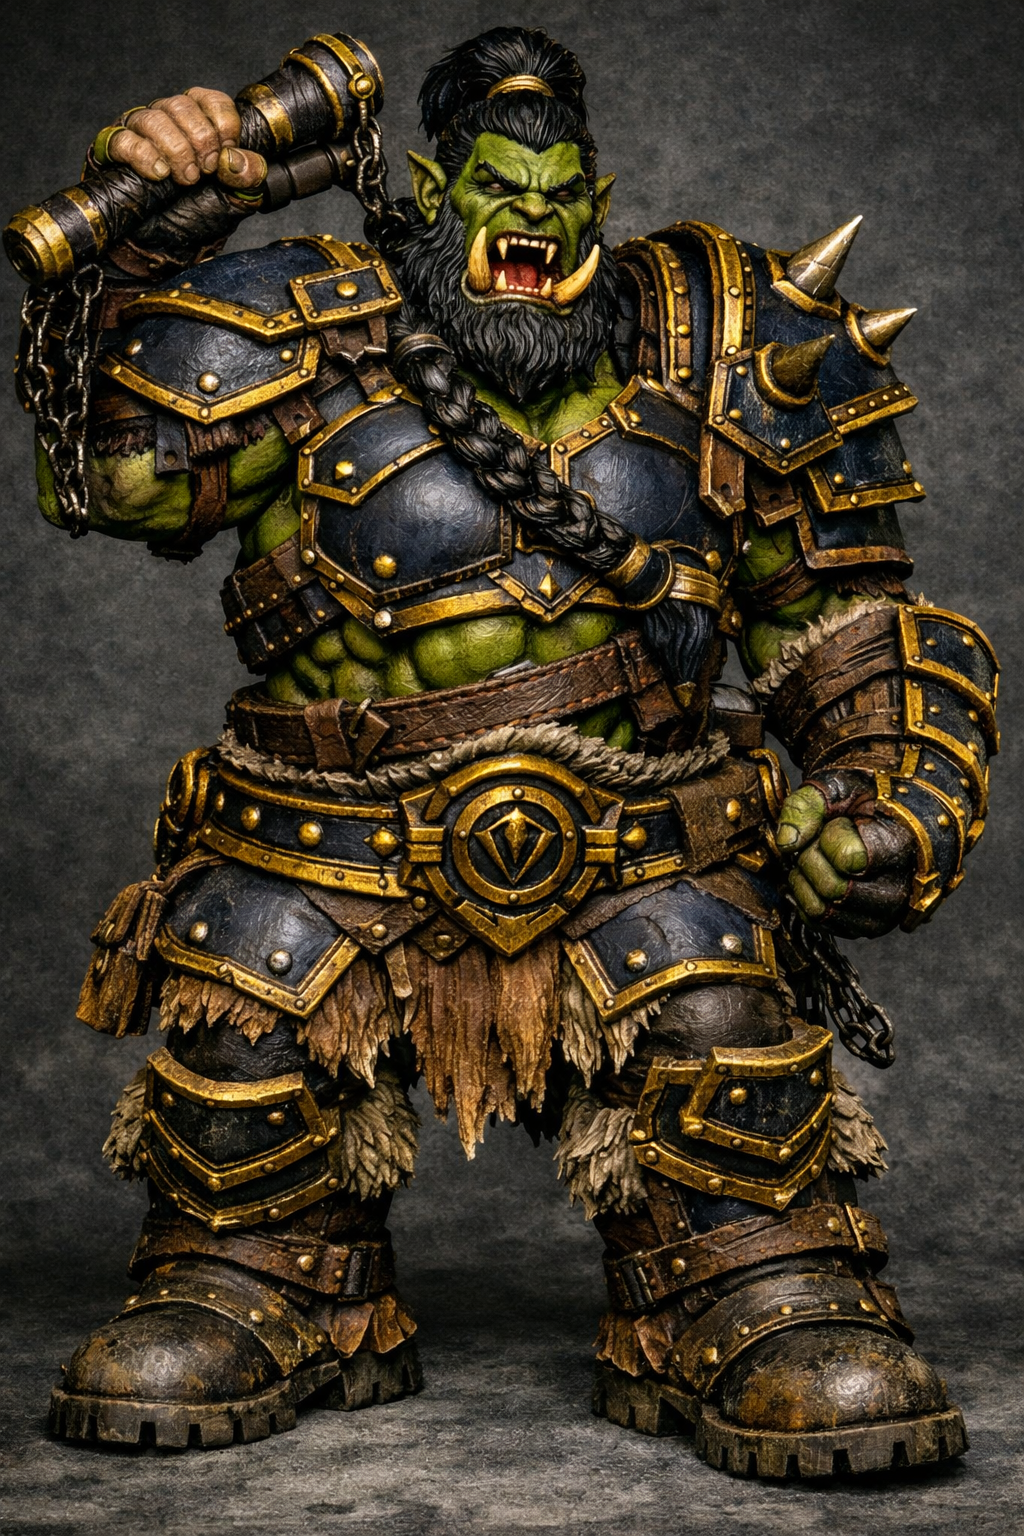
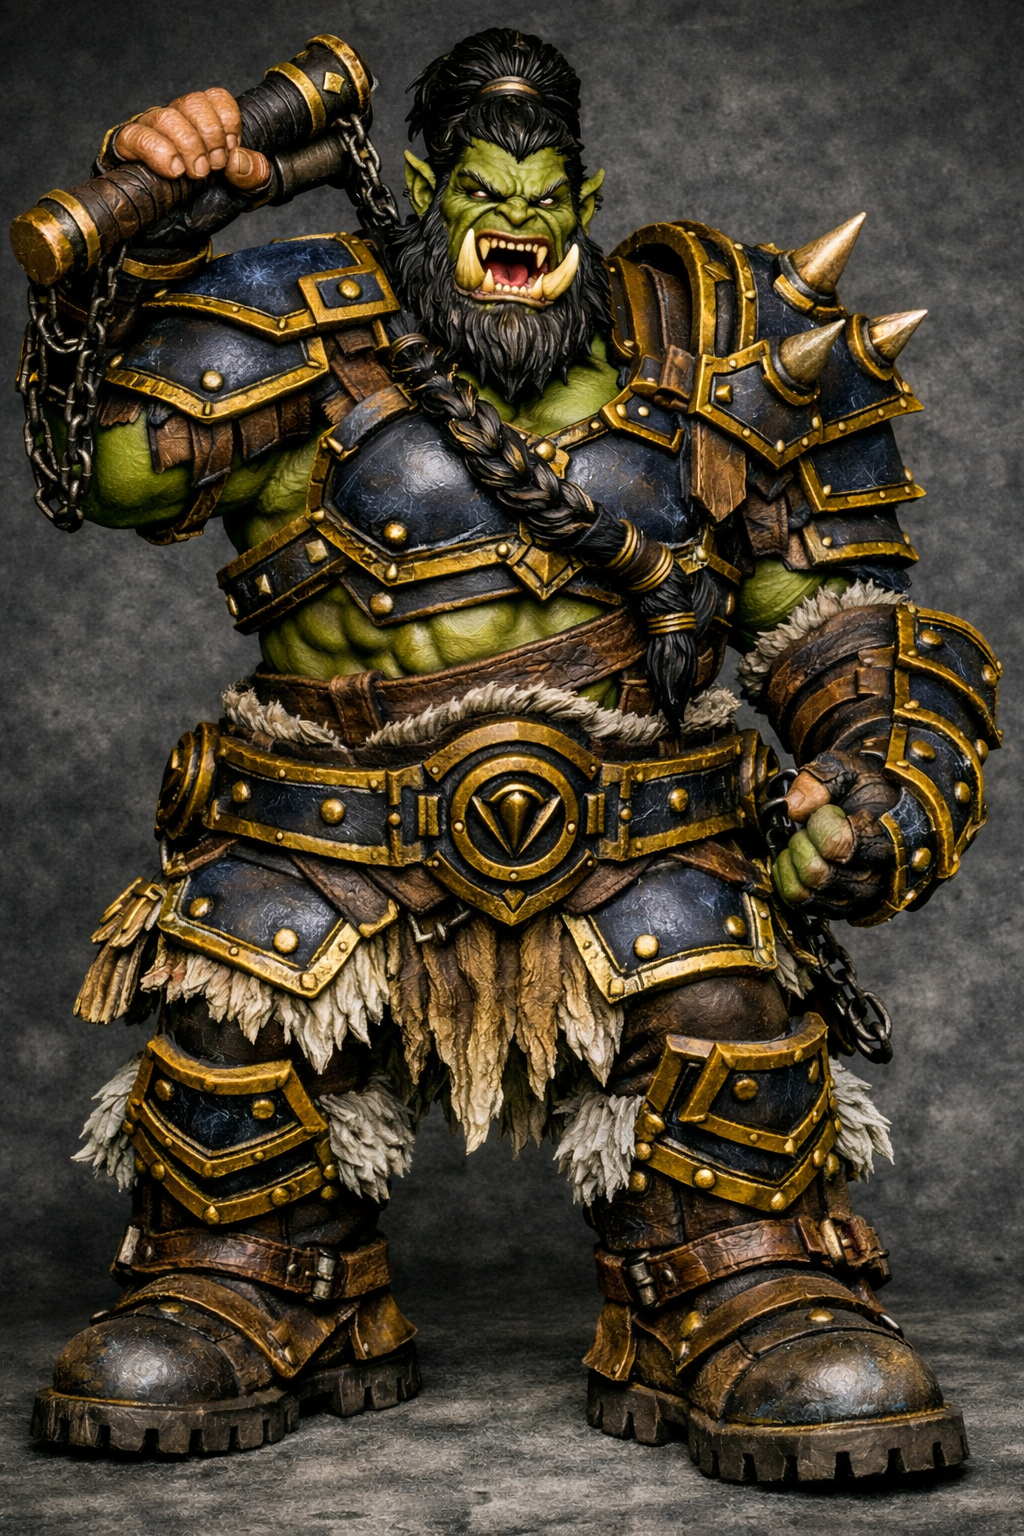
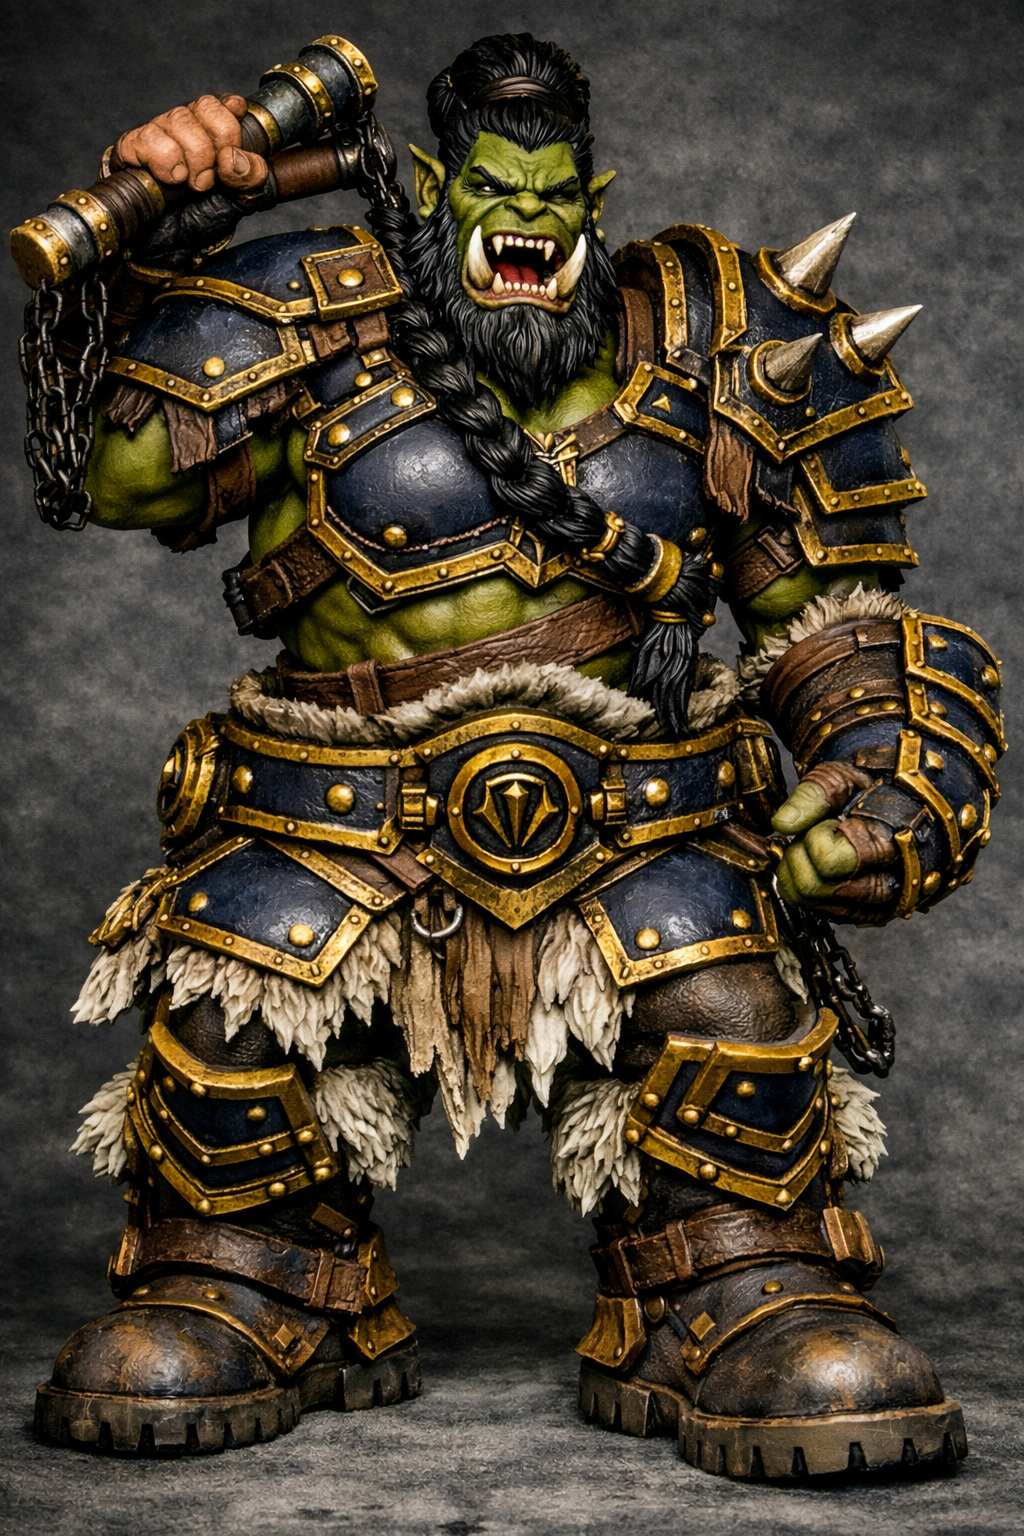
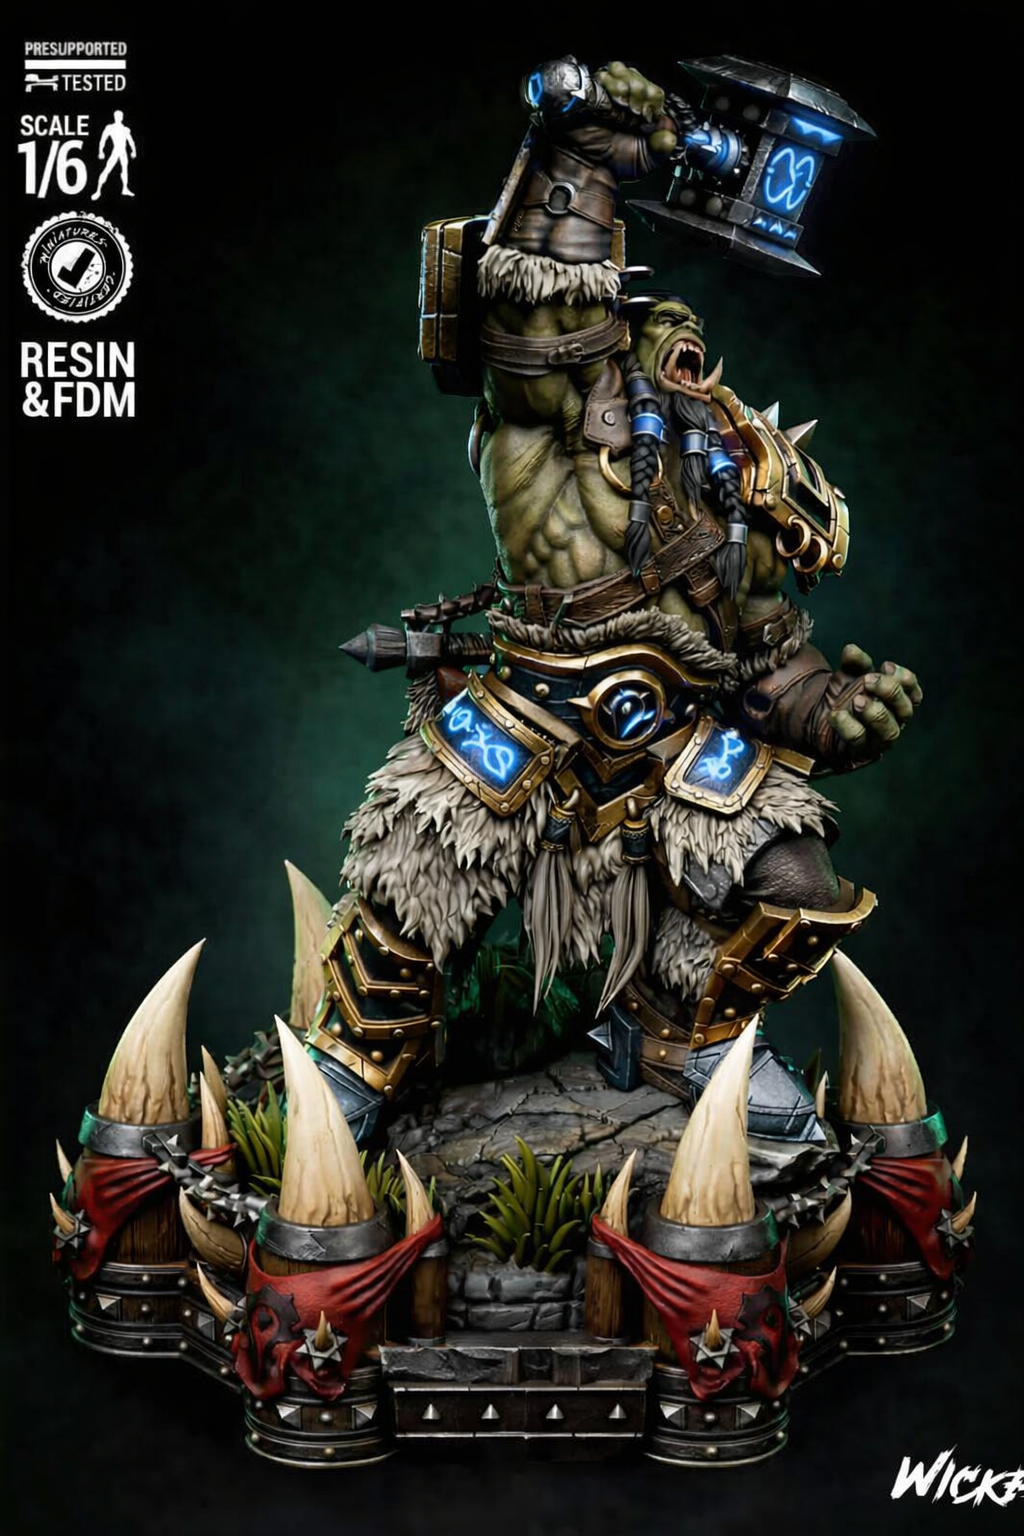
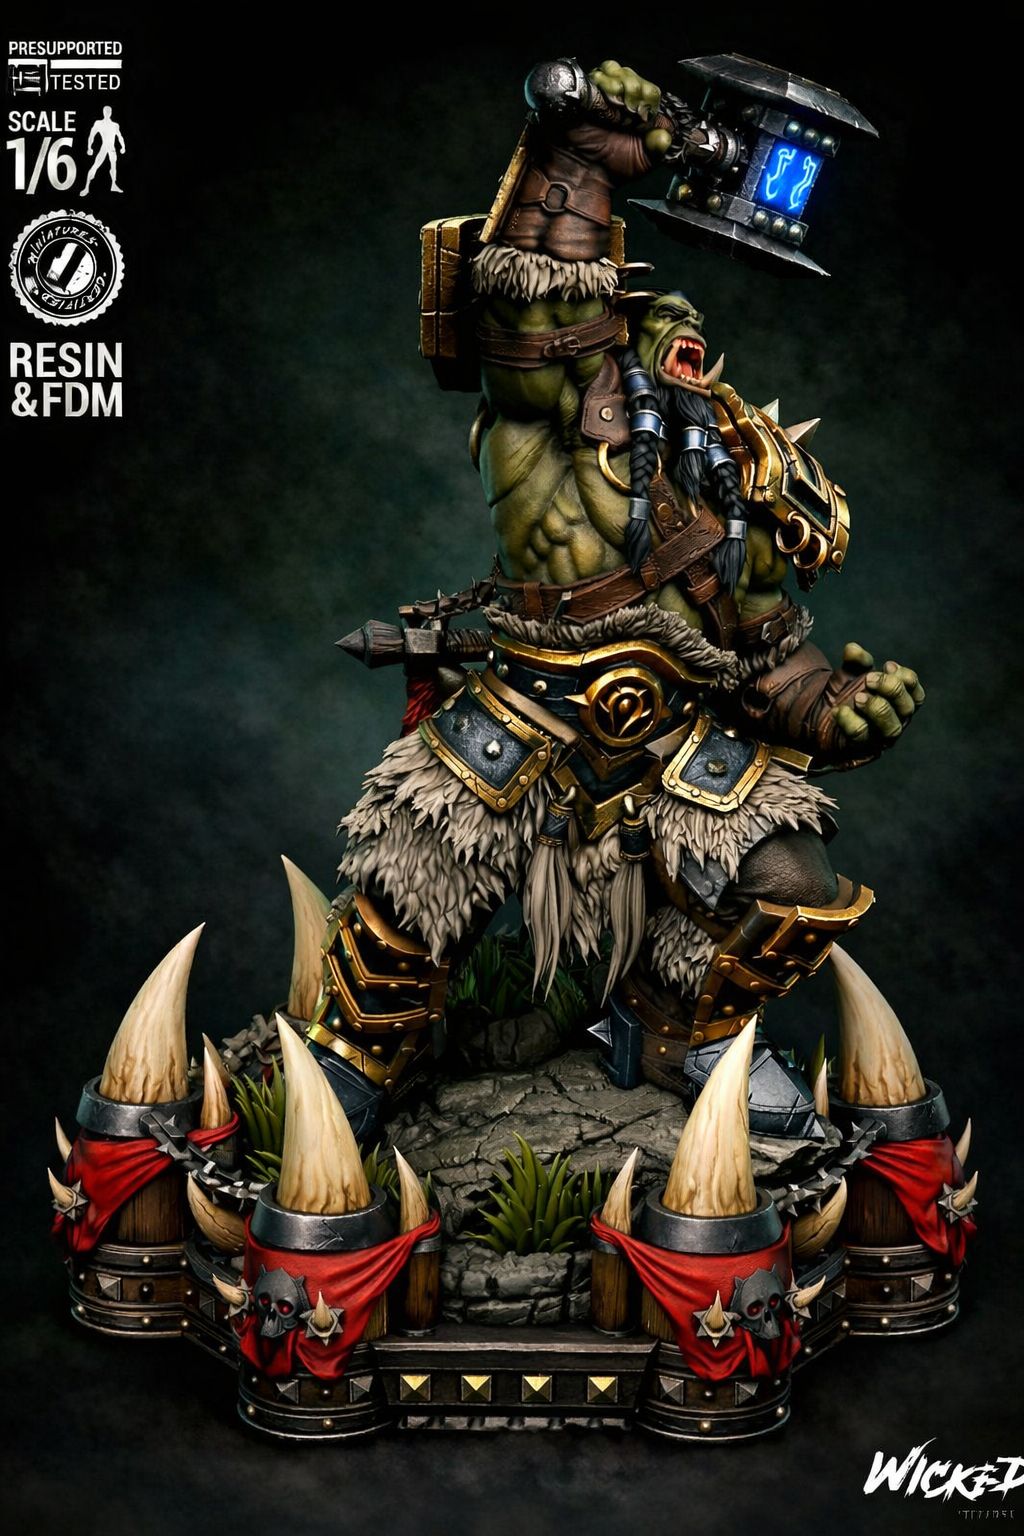
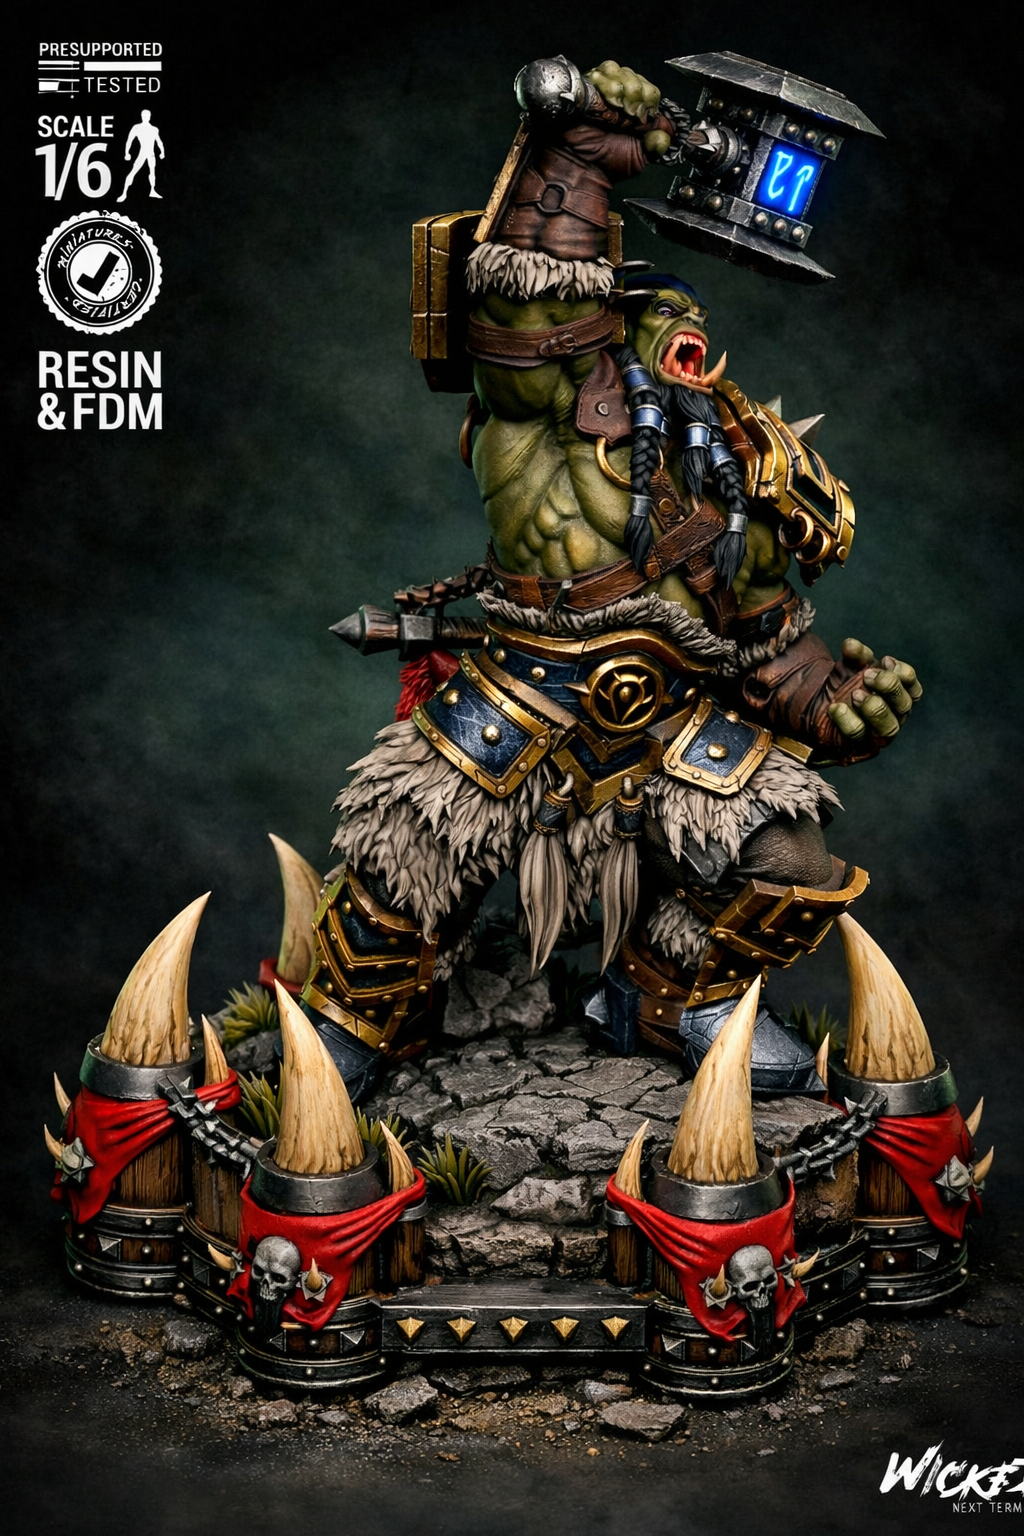
Thrall – Paint guide
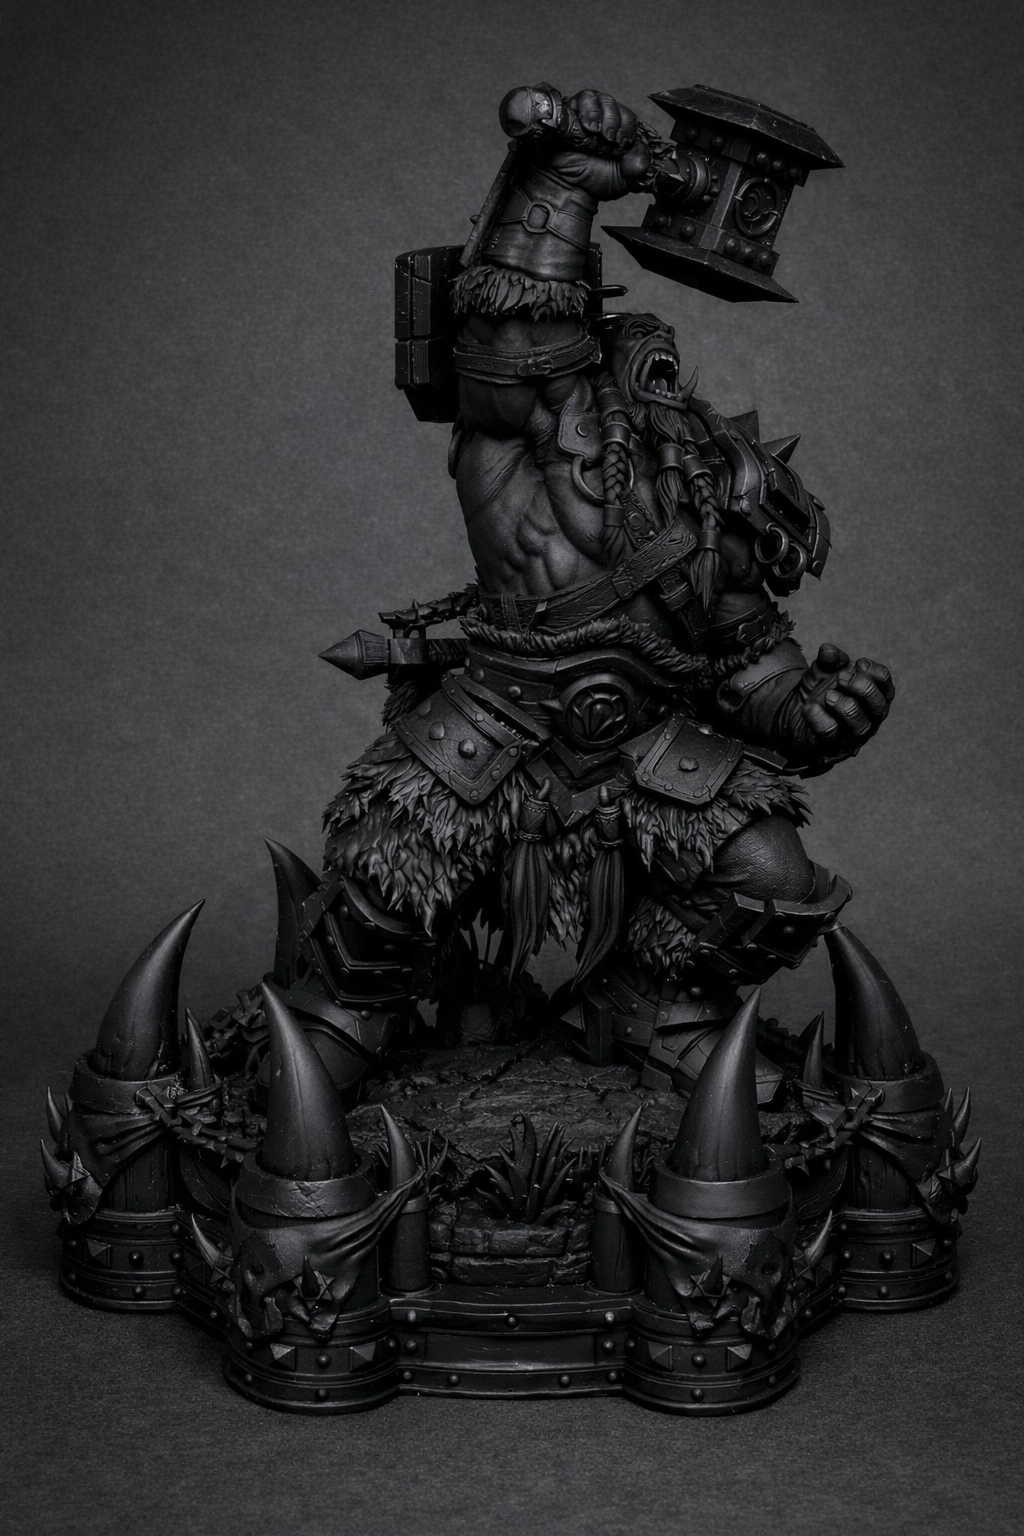
Step 1 — Black Prime
Paints: Black Primer (Vallejo Aerosol)
Prime the entire model in a smooth, even coat. Ensure no glossy spots remain.
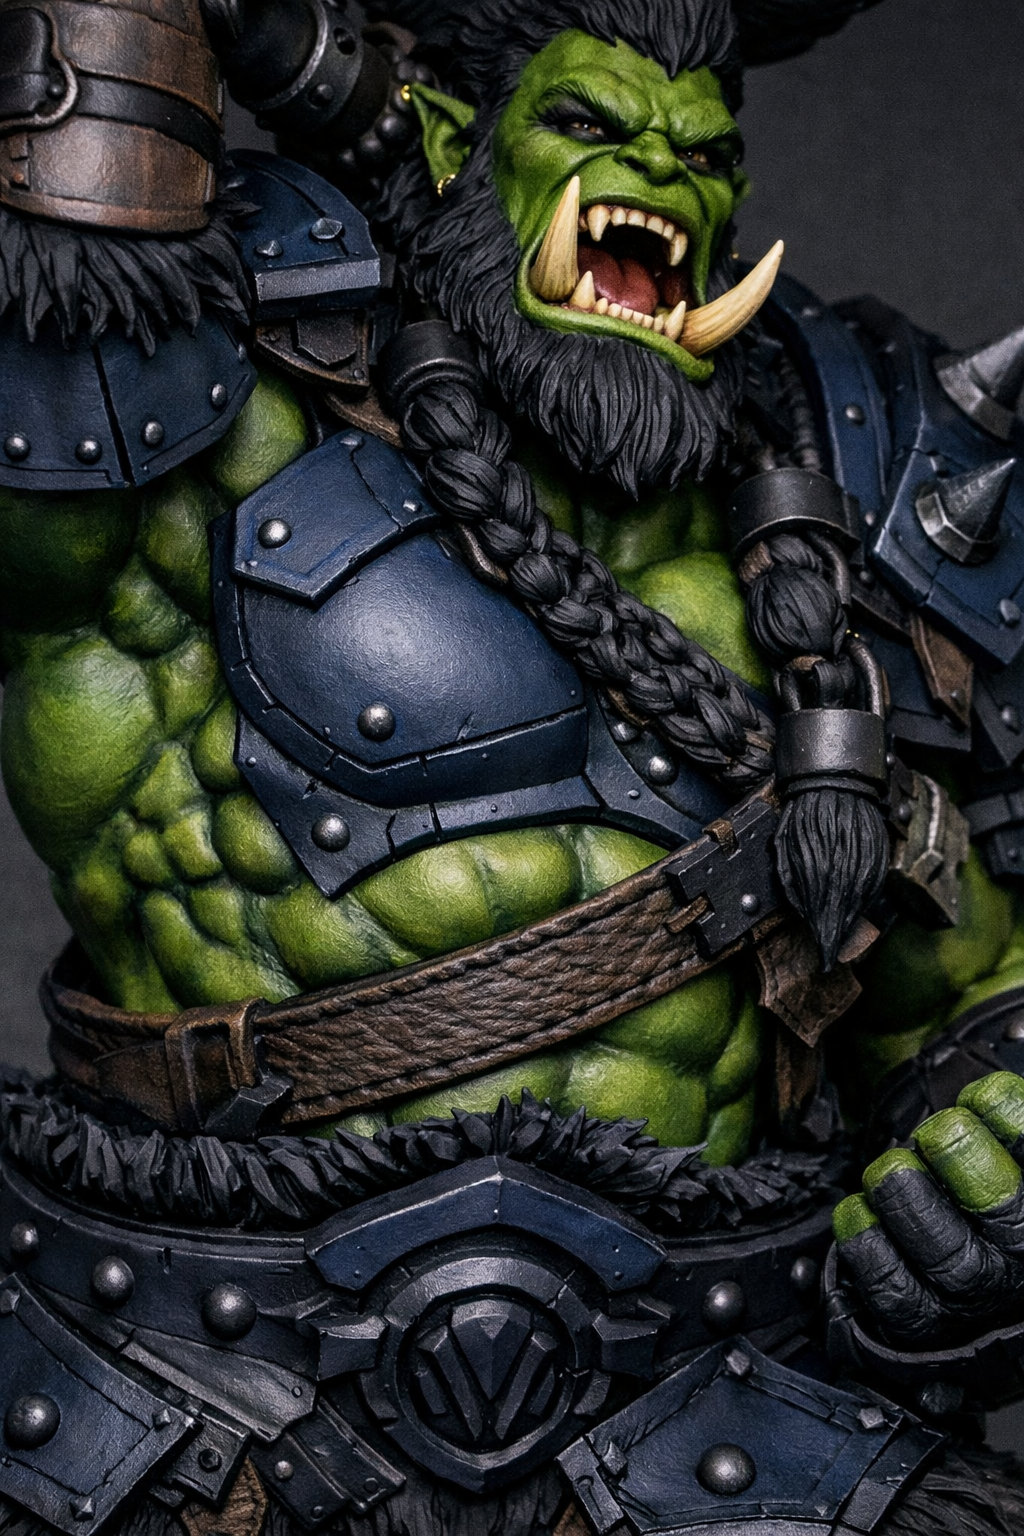
Step 2 — Deep Skin Shadows
Paints:
- 72.029 Dark Green
- 70.004 Ivory (for mixing)
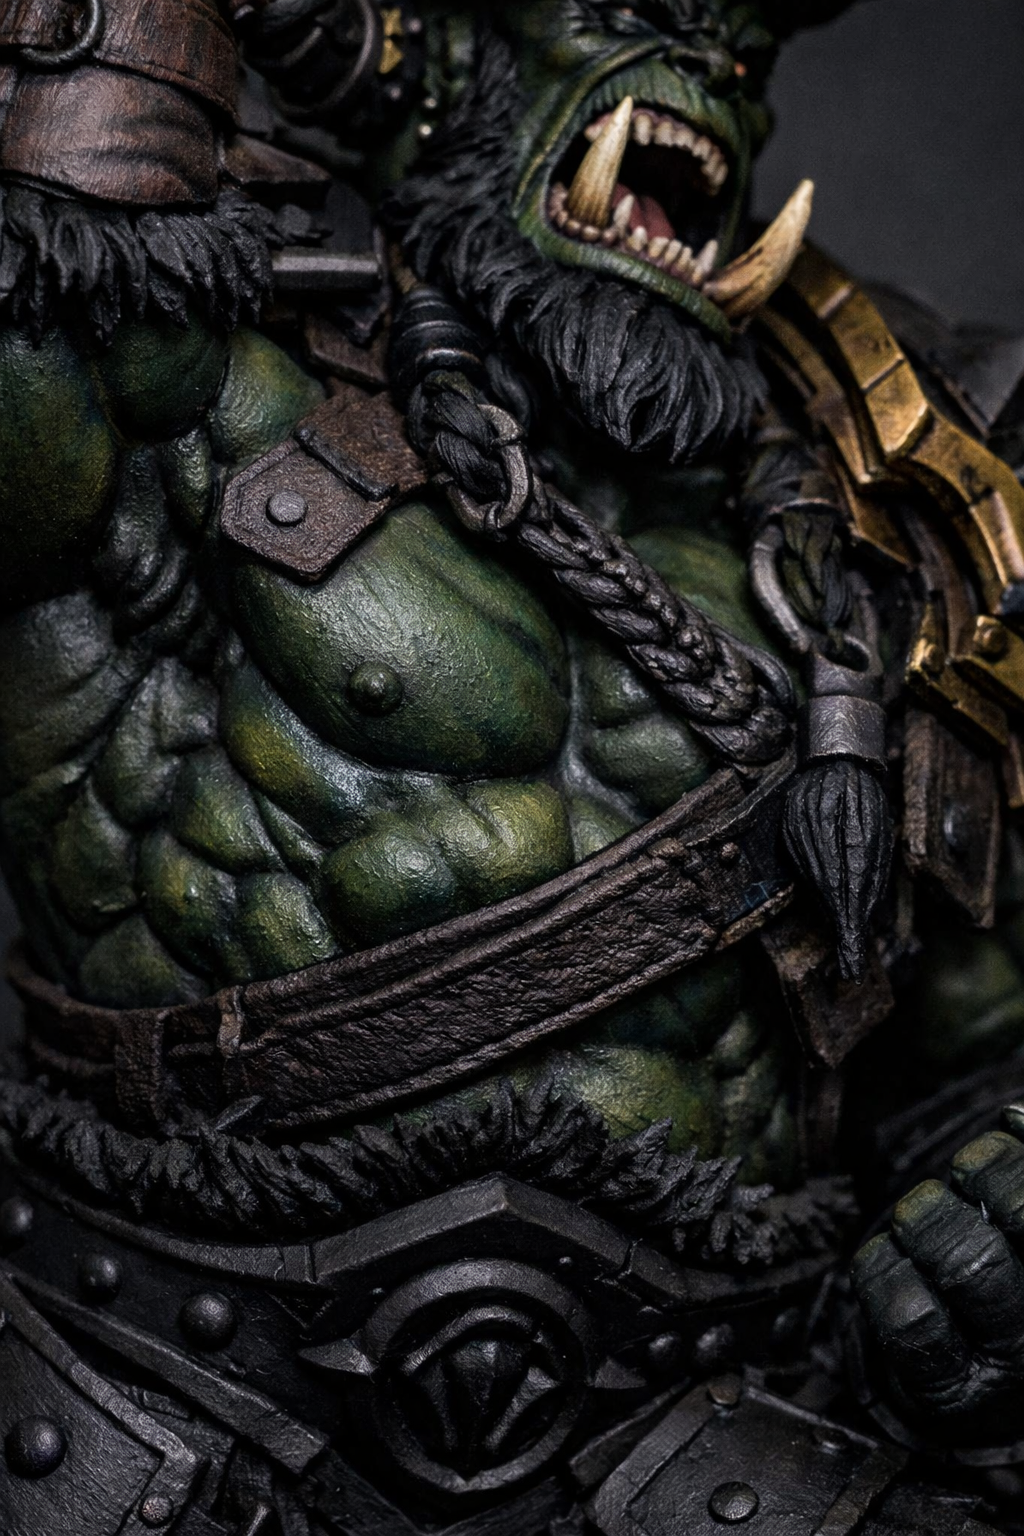
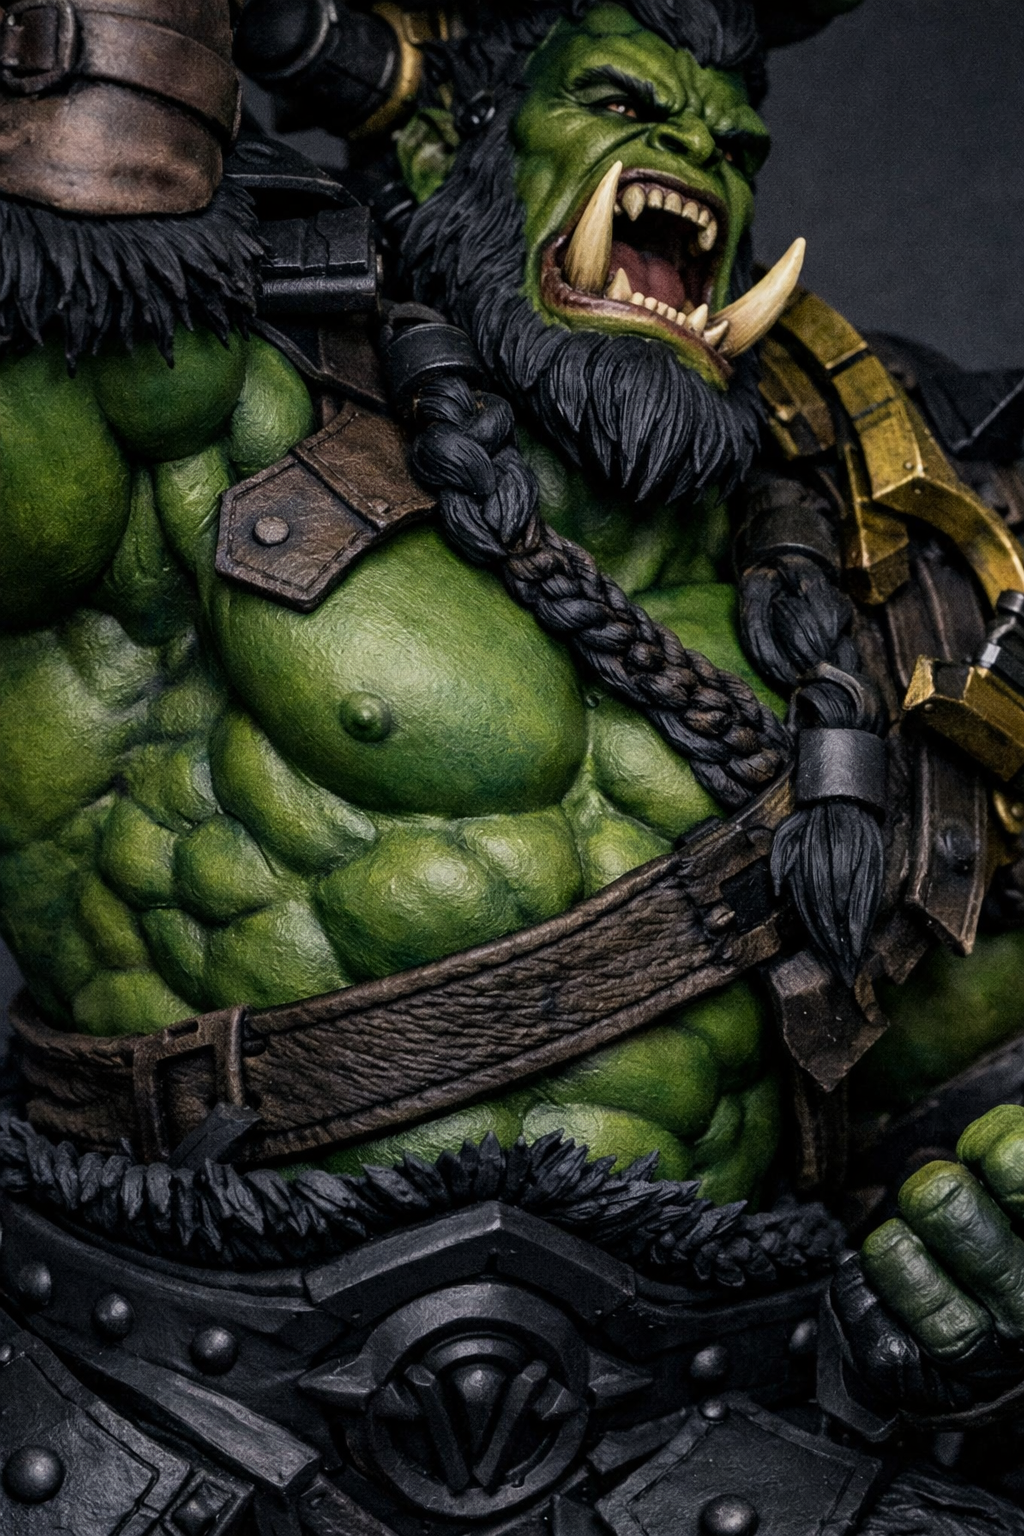
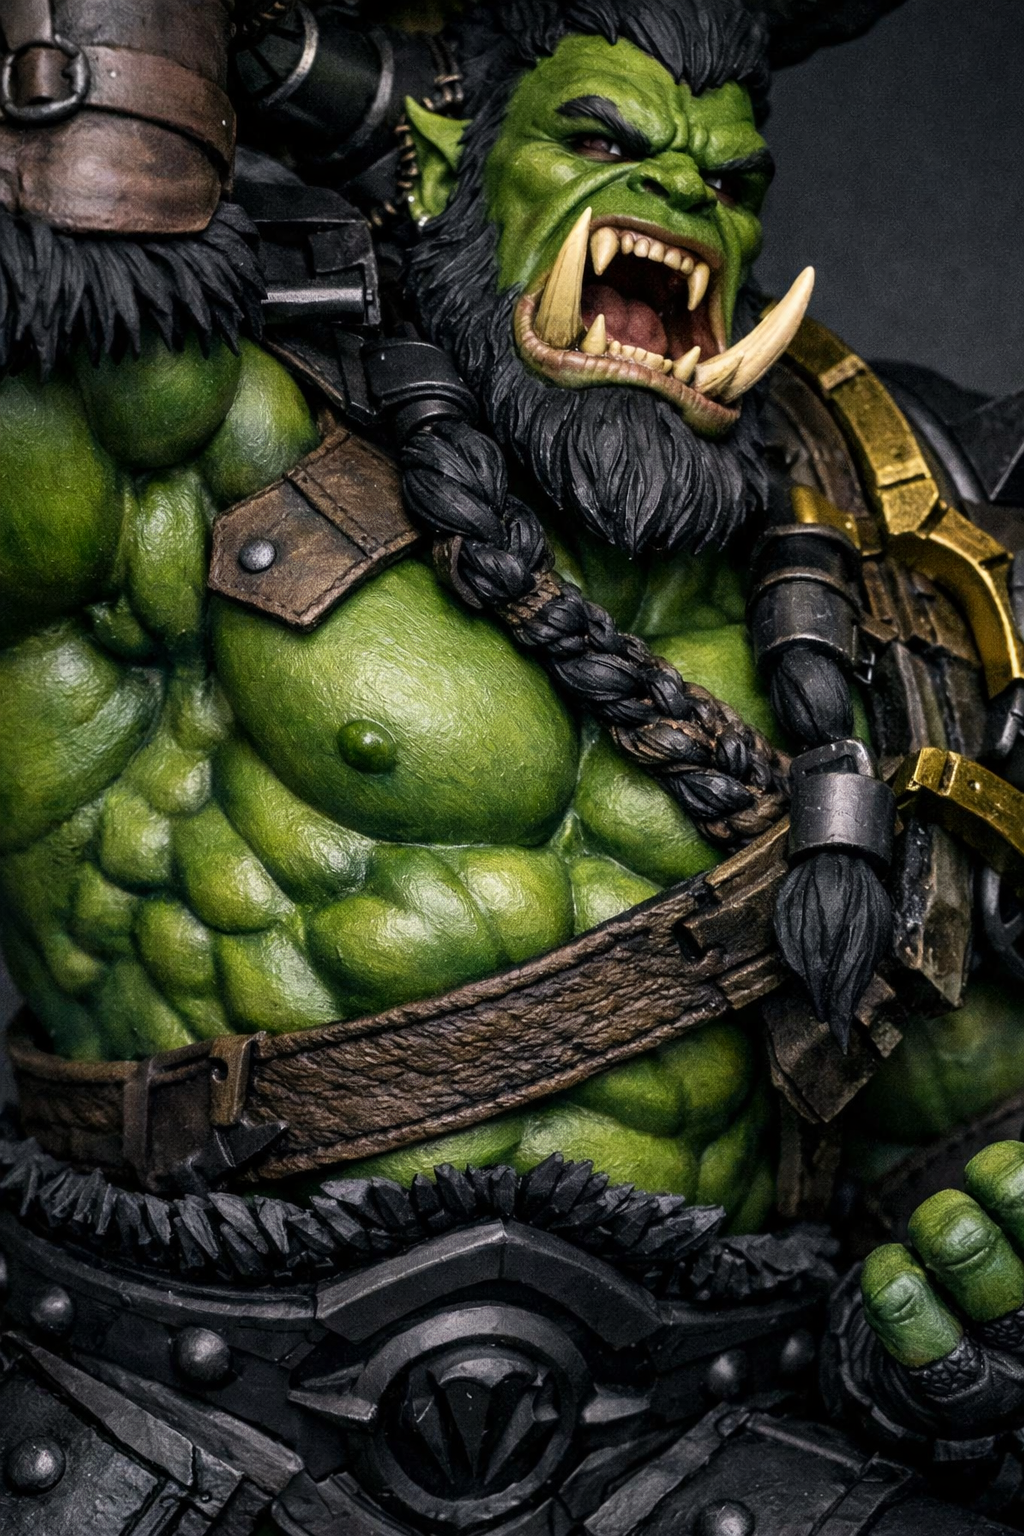
Mix Dark Green + a touch of Ivory to create a rich shadow tone. Push this into all recesses: under pecs, between fingers, under jawline.
Step 3 — Main Skin Layer
Paints:
- 72.031 Camouflage Green
- 72.029 Dark Green (for glazing)
Layer Camouflage Green over raised muscles, leaving shadows visible. Glaze Dark Green back into transitions if needed.
Step 4 — Skin Highlights
Paints:
- 72.031 Camouflage Green
- 70.004 Ivory
Add Ivory to Camouflage Green (10–20%). Highlight knuckles, cheekbones, biceps, and deltoids.
Step 5 — Armor Base
Paints:
- 70.072 Dark Sea Blue
- 70.185 Black Grey
Basecoat all armor plates with Dark Sea Blue. Shade lower edges with Black Grey.
Step 6 — Armor Highlights
Paints:
- 70.072 Dark Sea Blue
- 71.063 Silver (edge highlights)
Mix Dark Sea Blue + Silver (90/10) for subtle edges. Add pure Silver for final micro‑scratches.
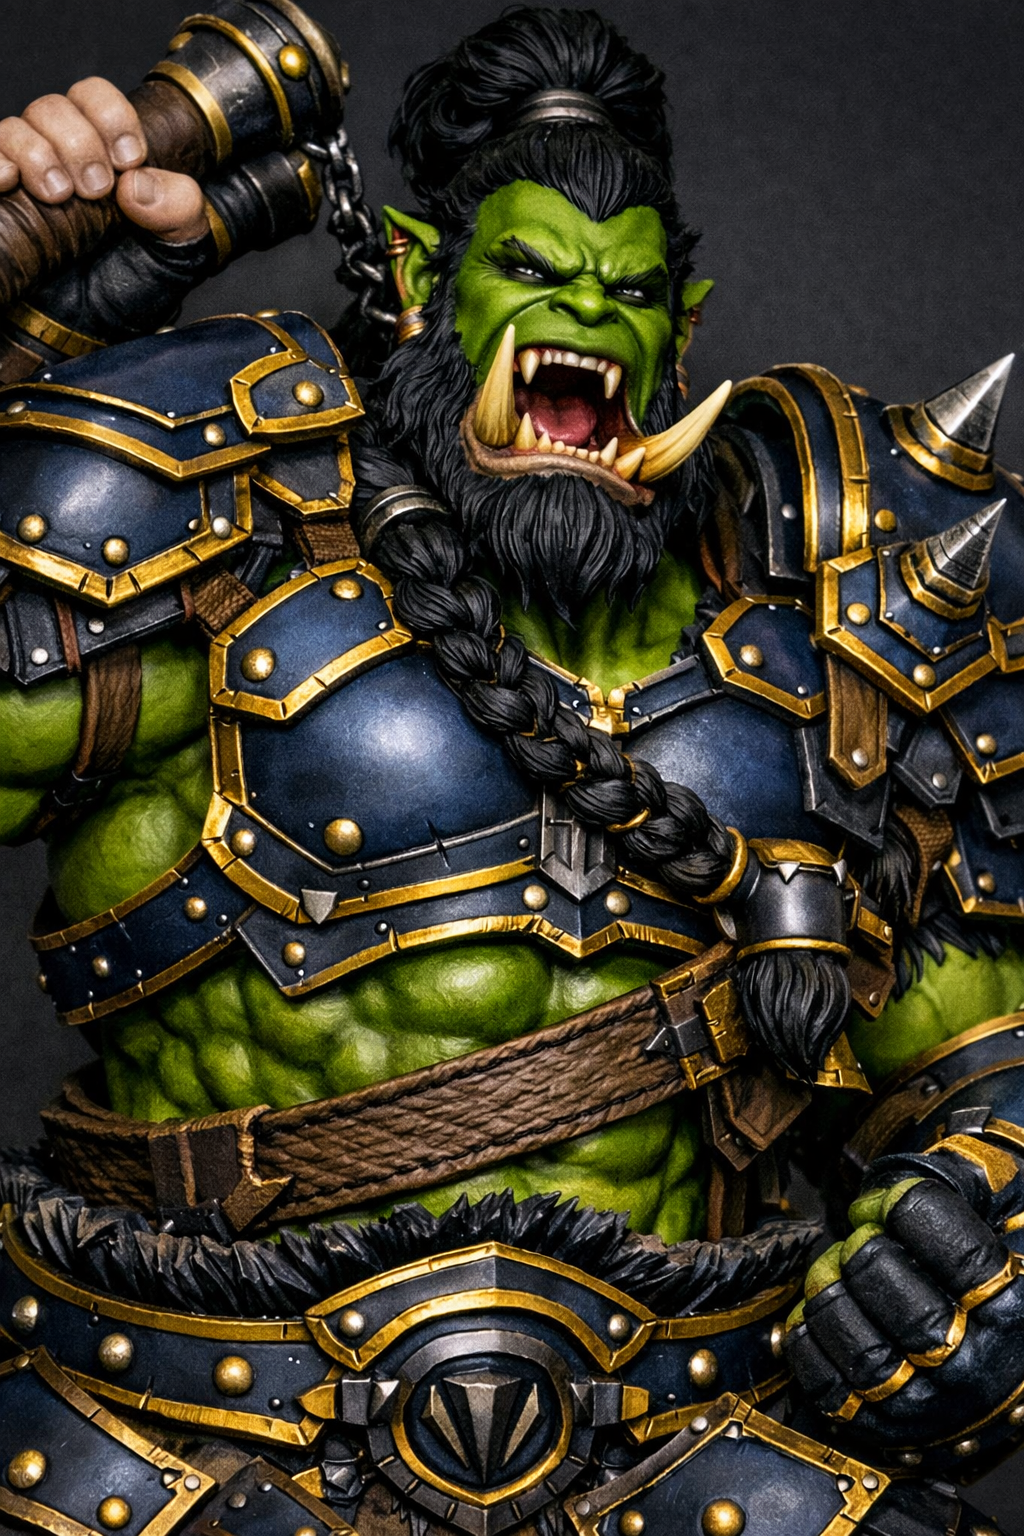
Step 7 — Armor Trim (Gold/Brass)
Paints:
- 70.202 Brass
- 70.185 Black Grey (for shading)
Basecoat trim in Brass. Shade with Black Grey. Highlight with Brass + Silver.
Step 8 — Leather Straps & Boots
Paints:
- 70.145 Cam. Black Brown
- 70.135 Chocolate Brown
- 70.151 Flat Earth
Straps: Cam. Black Brown → highlight with Flat Earth.
Boots: Chocolate Brown → highlight with Flat Earth.
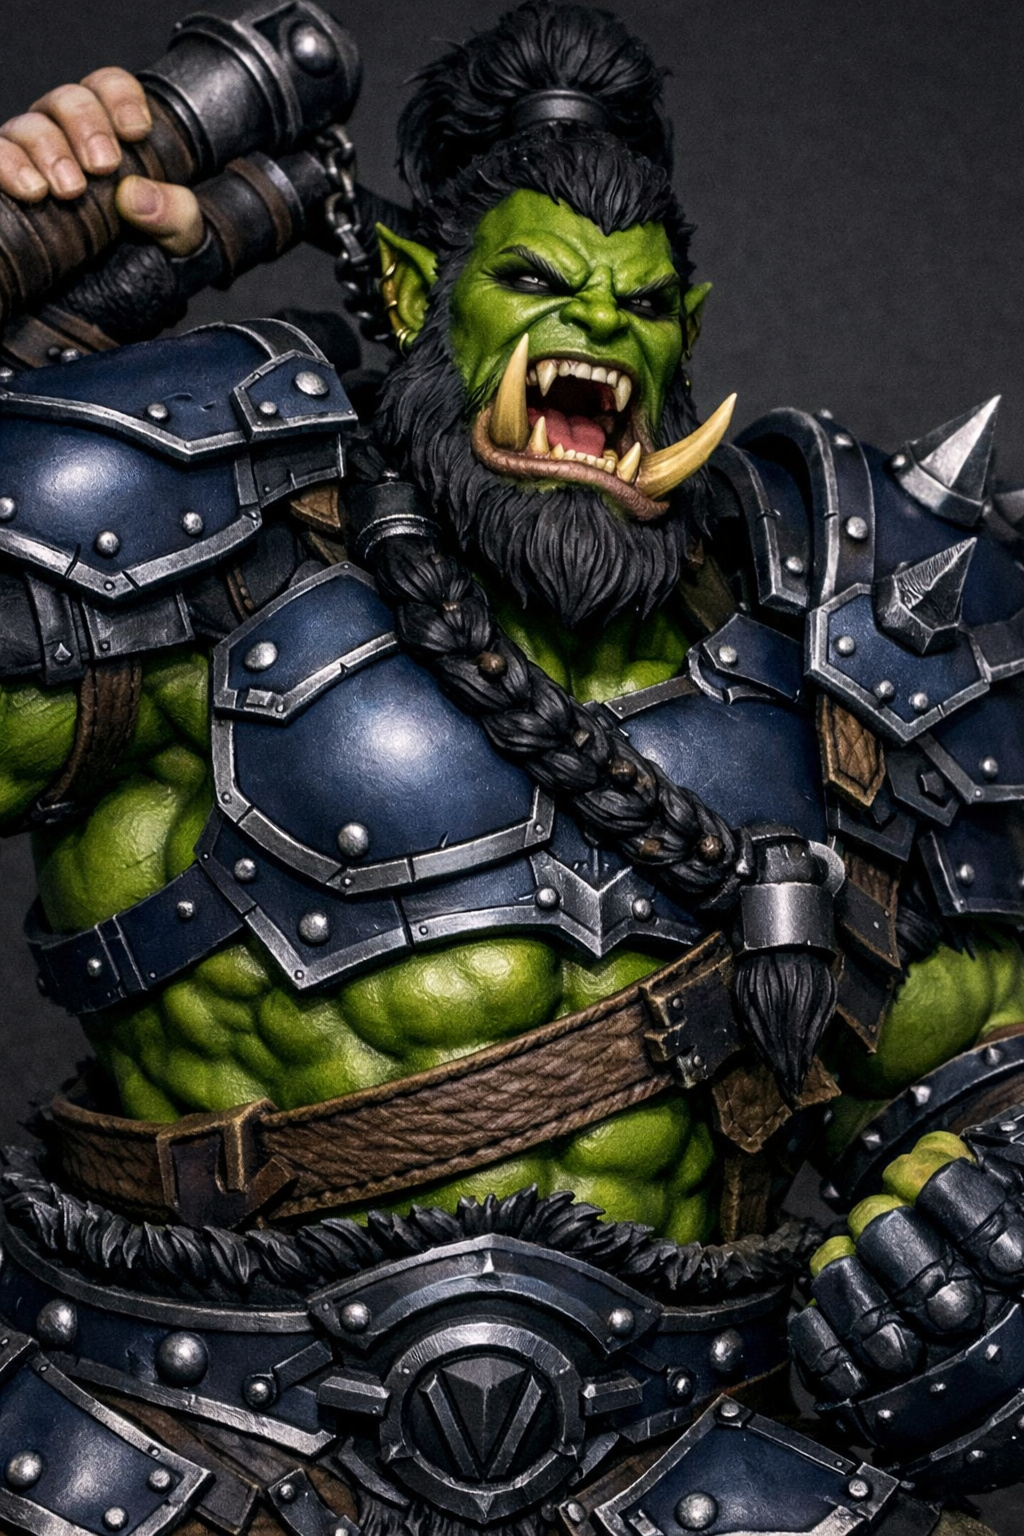
Step 9 — Fur Basecoat
Paints:
- 70.875 Beige Brown (new)
- 70.145 Cam. Black Brown (shadows)
Basecoat all fur with Beige Brown. Shade deep recesses with Cam. Black Brown.
Step 10 — Fur Desaturation Layer
Paints:
- 70.992 Neutral Grey (new)
Apply a thin Neutral Grey glaze to mute warmth and create a withered, aged look.
Step 11 — Fur Highlights
Paints:
- 70.918 Ivory
- 70.820 Off‑White (new)
Drybrush Ivory lightly. Add Off‑White to the highest tufts.
Step 12 — Cold Tone Accents
Paints:
- 70.869 Basalt Grey (new)
Add subtle cold highlights to tips and edges to contrast Thrall’s warm skin.

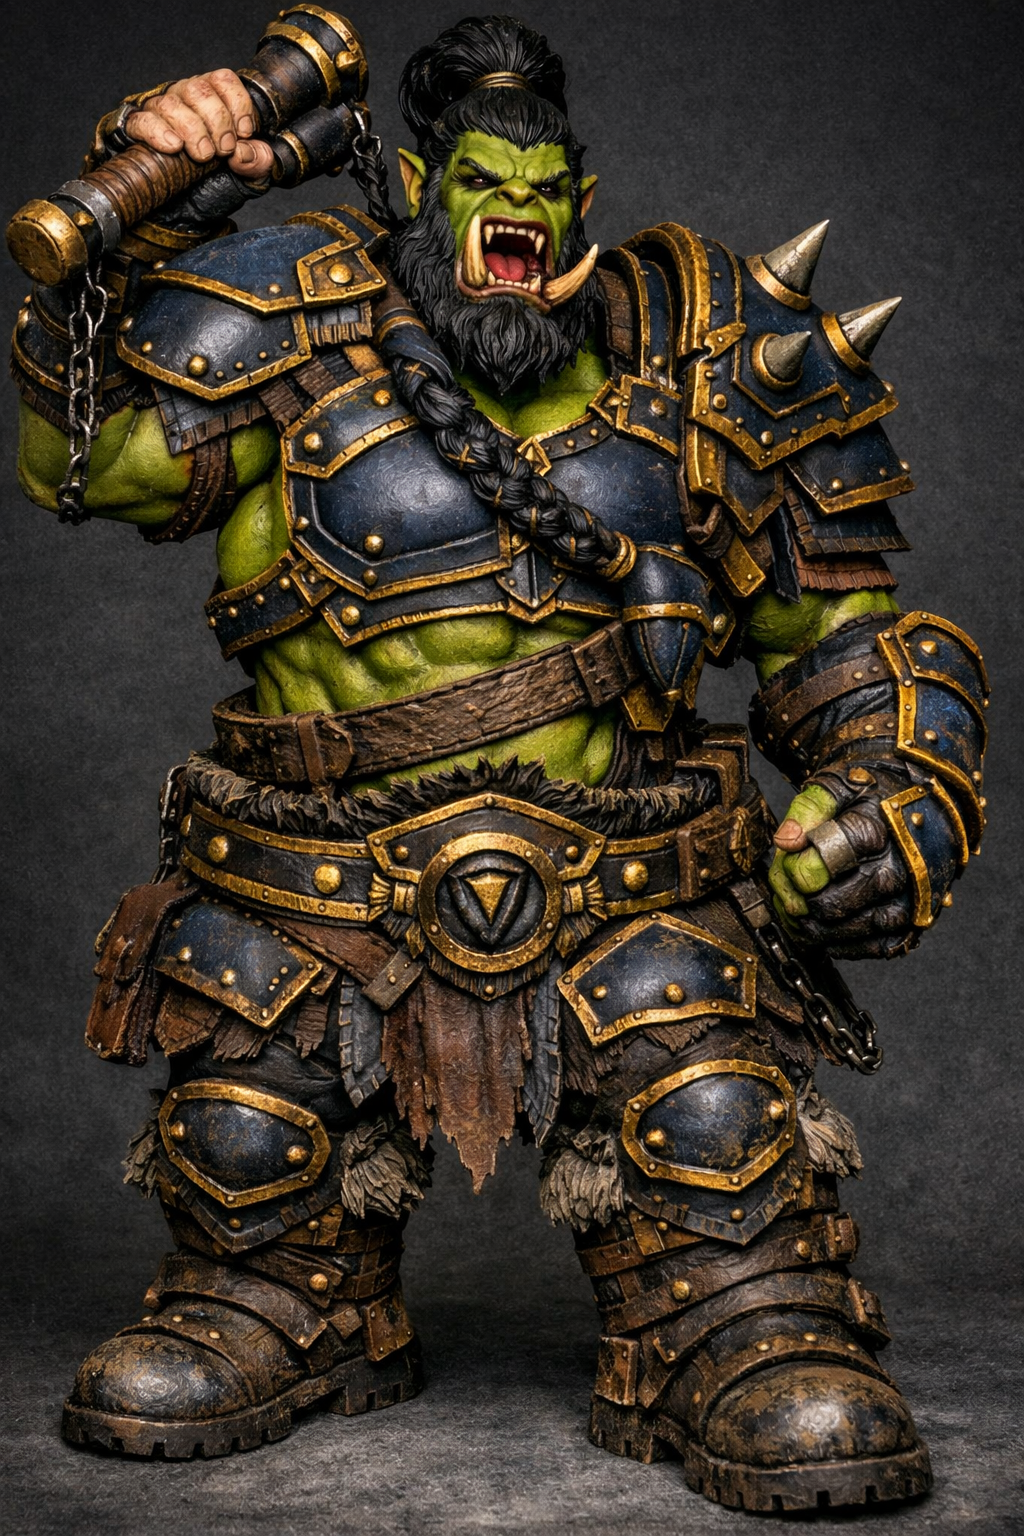
Step 13 — Doomhammer Metal
Paints:
- 71.065 Steel
- 71.063 Silver
- 70.185 Black Grey
Basecoat with Steel. Shade with Black Grey. Highlight with Silver.
Technique:
- Lay down a smooth Steel basecoat across all hammer metal surfaces.
- Deepen shadows and recesses with Black Grey, especially under the head and around rivets.
- Finish with Silver edge highlights and reflection points — top rim, corners, and chain links.
- Keep transitions clean and metallic; avoid over‑blending to preserve the crisp, forged look.
This step gives Doomhammer its signature cold steel finish — bright, weighty, and battle‑worn.
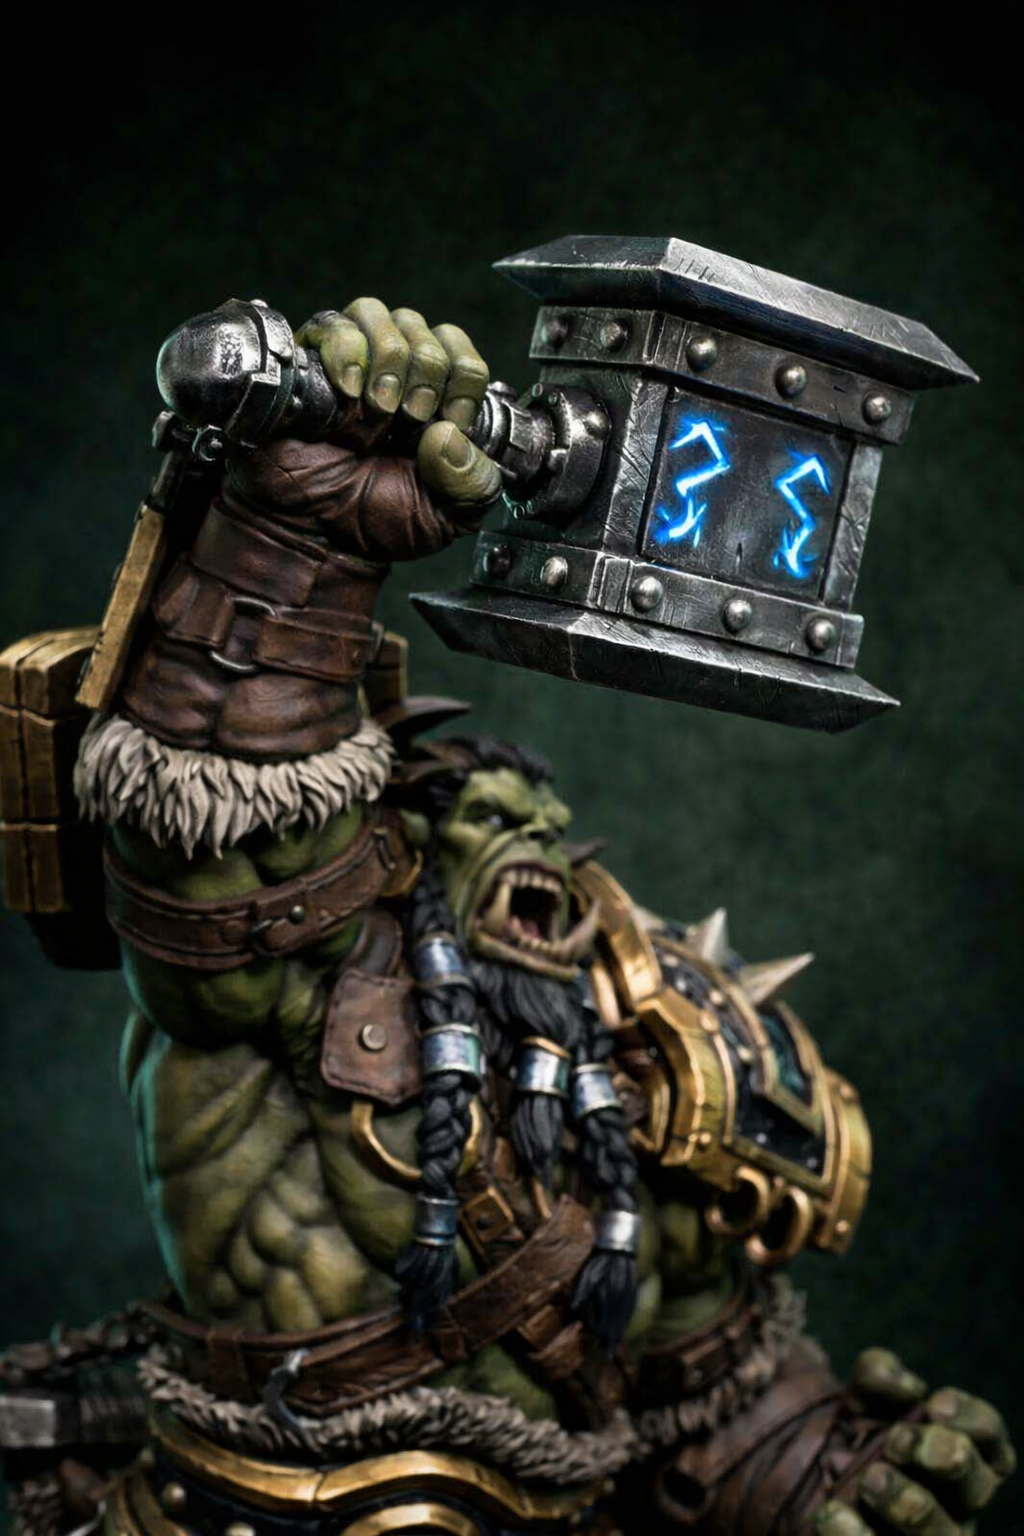
Step 14 — Doomhammer Runes
Paints:
- 72.023 Electric Blue
- 71.063 Silver (for glow points)
Paint runes Electric Blue. Add tiny Silver dots inside for magical sparkle.
Step 15 — Eyes & Red Accents
Paints:
- 70.039 Flat Red
- 70.004 Ivory (for glow mix)
Eyes: Flat Red → add Ivory for glow.
Banners: Flat Red base → highlight with Flat Red + Ivory.
Image Placeholder: [Step 15 Image Here]
Step 16 — Base & Final Touches
Paints:
- 70.185 Black Grey
- 70.151 Flat Earth
- 71.063 Silver (for rocks)
Base: Black Grey → drybrush Flat Earth.
Add Silver scratches to stones for a gritty battlefield look.
The rocky ground is dry‑brushed with Flat Earth over Black Grey, giving a gritty, battle‑scarred texture. The Silver scratches on the stones add realism and contrast against the muted tones of the fur and banners. Small tufts of grass and dusted edges complete the scene, grounding Thrall in a believable battlefield environment.
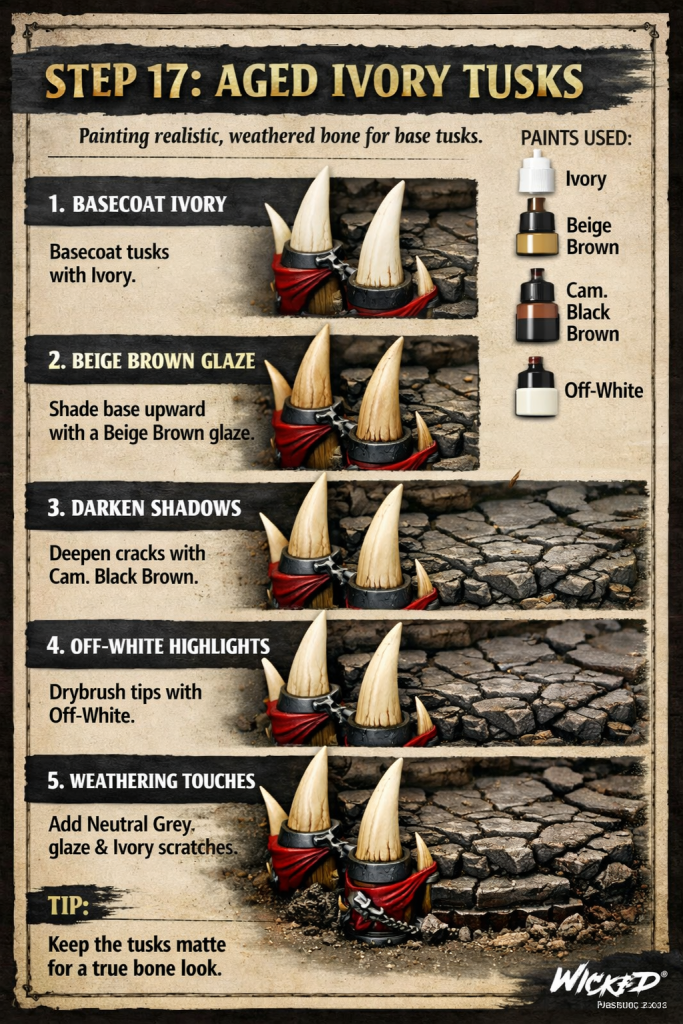
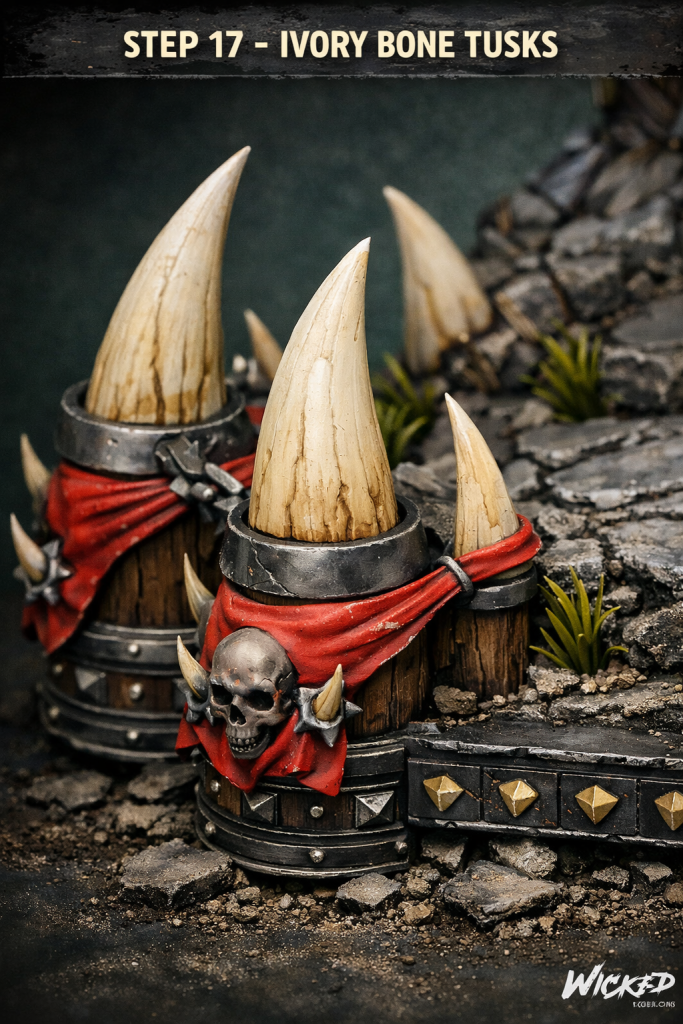
Step 17 — Ivory Spikes & Bone Finish
Goal: Achieve realistic, aged ivory with subtle warmth and natural wear.
Paints
- Basecoat: 70.918 Ivory
- Mid‑tone glaze: 70.875 Beige Brown
- Shadow tone: 70.145 Cam. Black Brown
- Highlight: 70.820 Off‑White
- (Optional aging tint) 70.992 Neutral Grey for desaturation
🧩 Method
- Basecoat: Apply a smooth layer of Ivory across each tusk. Keep brush strokes vertical to follow the grain.
- Warm Glaze: Thin Beige Brown to a translucent wash (1 part paint : 3 parts thinner). Brush lightly from base upward to simulate natural darkening near the root.
- Shadow Depth: Mix Cam. Black Brown + Beige Brown (1:1) and push into cracks, underside curves, and near metal bands. Feather outward for soft transitions.
- Highlight: Drybrush Off‑White along the upper ridges and tips. Focus on edges catching light.
- Aging Tint (optional): Apply a faint Neutral Grey glaze to tone down warmth and mimic aged bone.
- Final Polish: Add micro‑scratches or stippling with Ivory + Off‑White (50/50) for texture realism.
🧠 Pro Tip
Keep the tusks matte — avoid gloss varnish. A satin finish works best to preserve the organic bone look.
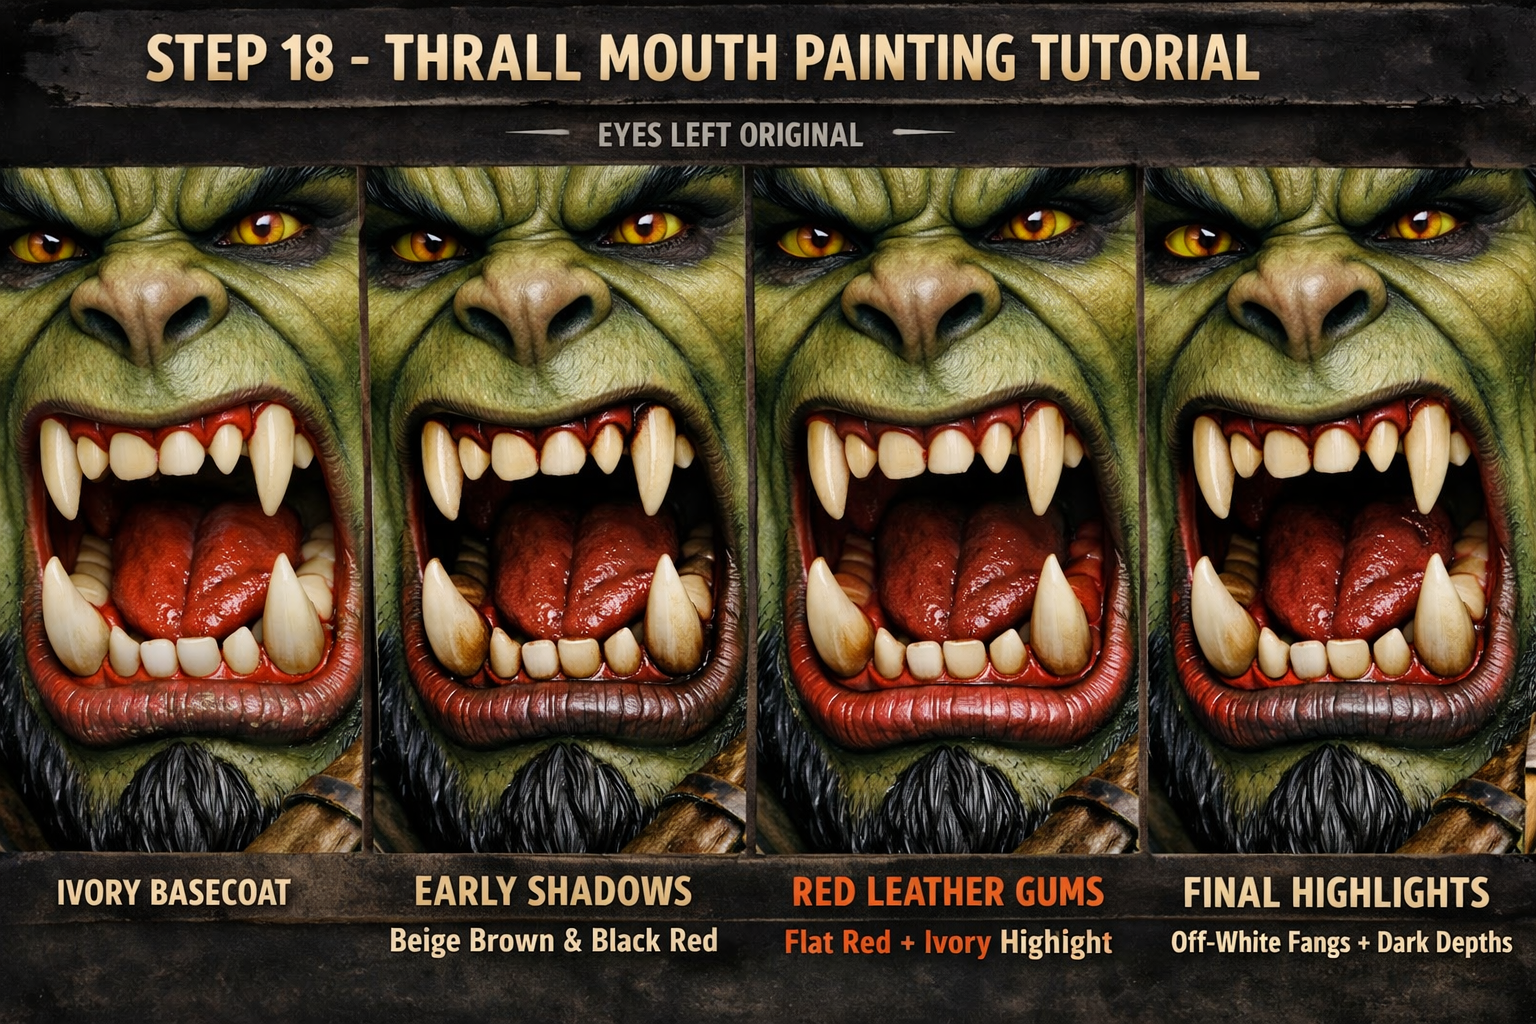
🧠 Step 18 — Face, Fangs & Mouth
Goal: Capture Thrall’s ferocity with lifelike skin transitions, natural ivory fangs, and a deep, believable mouth cavity.
🎨 Paints
- Skin tones: 72.031 Camouflage Green, 70.004 Ivory, 72.029 Dark Green
- Fangs: 70.918 Ivory, 70.875 Beige Brown, 70.820 Off‑White
- Mouth interior: 70.814 Burnt Red, 70.859 Black Red, 70.926 Red Leather
- Tongue highlights: 70.814 Burnt Red + 70.004 Ivory (10%)
- Gums: 70.926 Red Leather + 70.859 Black Red (1:1)
🧩 Method
- Skin Refinement: Glaze Dark Green into jawline recesses; highlight cheekbones and lips with Camouflage Green + Ivory (15%).
- Fangs Basecoat: Apply Ivory evenly.
- Aging Wash: Glaze Beige Brown near the roots and between teeth for natural discoloration.
- Highlight Tips: Drybrush Off‑White lightly on fang edges and points.
- Mouth Depth: Basecoat interior with Black Red, then layer Burnt Red toward the front.
- Tongue & Gums: Blend Red Leather + Ivory for subtle warmth; add micro‑highlights along the tongue ridge.
- Final Contrast: Edge the lips with Dark Green + Black Red (1:1) to frame the mouth and enhance expression.
⚙️ Pro Tip
Use a satin varnish on the tongue and gums only — it gives a moist, lifelike finish without making the fangs glossy.
🟢 Skin Substitutions
| Original | Substitute | Notes |
|---|---|---|
| 72.031 Camouflage Green | 72.030 Goblin Green + 70.886 Green Grey (1:1) | Gives that muted olive base. |
| 72.029 Dark Green | 72.028 Dark Green Ink or 70.979 German Cam. Dark Green | Use as a glaze for shadows. |
| 70.004 Ivory | 70.918 Ivory or 70.820 Off‑White | Either works for highlights. |
🦷 Fangs
| Original | Substitute | Notes |
|---|---|---|
| 70.918 Ivory | Same | You already have it. |
| 70.875 Beige Brown | 70.983 Flat Earth (very close warmth) | Slightly darker, gives aged tone. |
| 70.820 Off‑White | Same | Perfect for drybrush highlights. |
🔴 Mouth & Gums
| Original | Substitute | Notes |
|---|---|---|
| 70.814 Burnt Red | 70.957 Flat Red + 70.983 Flat Earth (1:1) | Creates a deep, warm red. |
| 70.859 Black Red | 70.822 German Cam. Black Brown + 70.957 Flat Red (2:1) | Mix for dark recesses. |
| 70.926 Red Leather | 70.981 Orange Brown + 70.957 Flat Red (1:1) | Warm, leathery gum tone. |
🧩 Mixing Ratios
- Tongue highlights: Flat Red + Ivory (10%)
- Gums: Red Leather mix + Black Red mix (1:1)
This adjusted set will give you nearly identical results to the original Vallejo recipe — same warmth, same depth, and perfect compatibility with your existing paints.
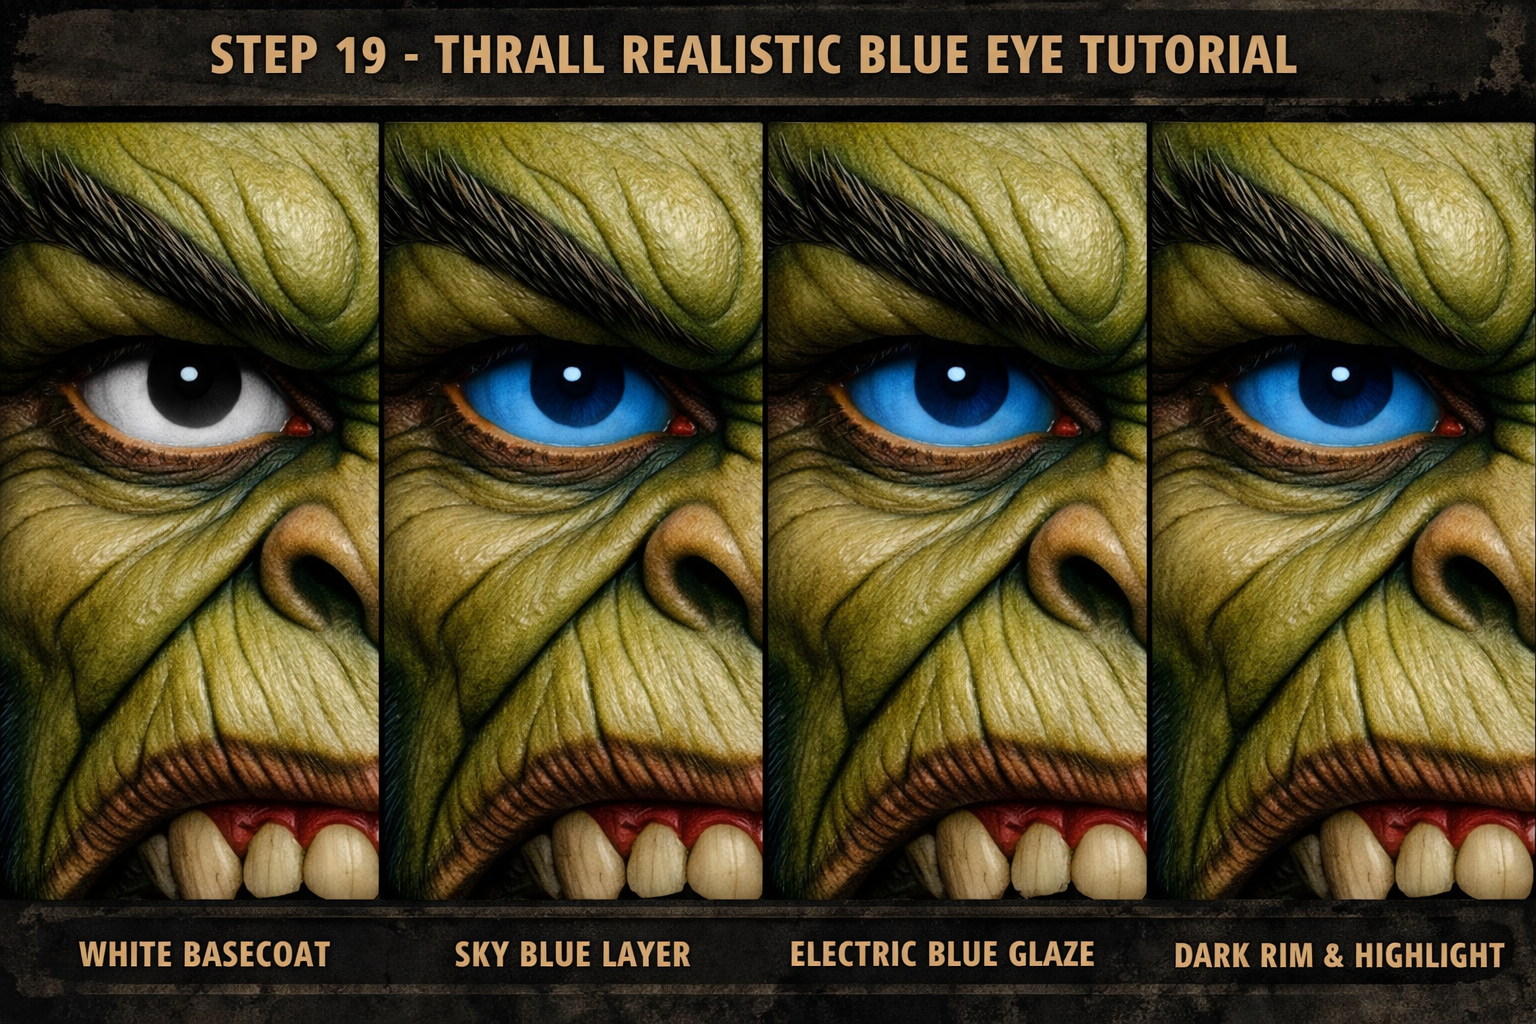
👁️ Step 19 — Thrall’s Eyes (Blue, Realistic Progression)
Goal: Build the blue eyes gradually from a neutral base, keeping the glow believable and not over‑saturated.
🎨 Paints
| Stage | Vallejo Paint | Purpose |
|---|---|---|
| 1. White Base | 70.951 White | Establish clean foundation for brightness. |
| 2. Sky Blue Layer | 70.961 Sky Blue | Soft, even coverage for iris tone. |
| 3. Electric Blue Glaze | 72.023 Electric Blue | Adds vibrancy and inner glow. |
| 4. Dark Prussian Blue Rim | 70.899 Dark Prussian Blue | Defines outer edge and socket depth. |
| 5. Off‑White Highlight | 70.820 Off‑White + Sky Blue (1:1) | Creates reflection and life. |
🧩 Method
- White Base: Paint the entire eye area white — this ensures luminosity later.
- Sky Blue Layer: Cover the iris evenly, leaving the pupil white for now.
- Electric Blue Glaze: Thin and apply toward the center for subtle glow.
- Dark Prussian Blue Rim: Shade the outer edge and under the eyelid for depth.
- Off‑White Highlight: Add a pinpoint reflection and faint inner glow.
⚙️ Pro Tip
Keep transitions feathered — the white base should peek through slightly under the blues to mimic natural light reflection.
I’m the kind of person who can lose hours tweaking home automation, tuning a 3D printer, or soldering something that definitely didn’t need soldering. I paint 3D‑printed models for fun, hit the trails on my mountain bike, and have an unhealthy love for Mercedes. When I’m not deep in a Stargate marathon, a Person of Interest rewatch, or a Burn Notice nostalgia kick, you’ll probably find me grinding in World of Tanks or diving into World of Warcraft.